Room 1010: Kendo’s Gun Shop
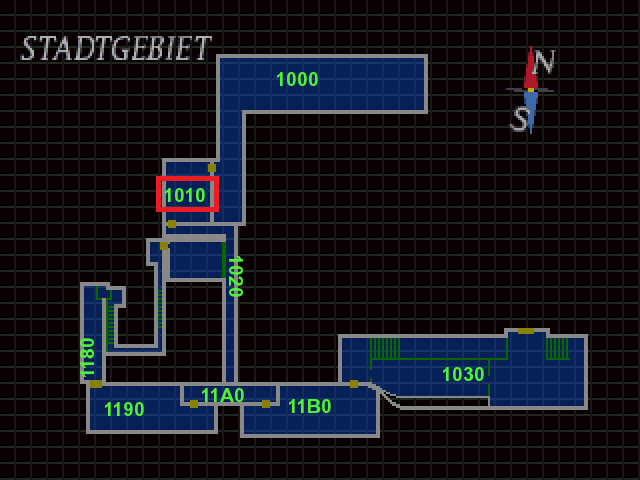
After escaping the zombies on the street in the beginning of the game in room 1000, the player will enter Kendo Gun Shop, which is shown as room 1010 in the above image. The owner of the store Robert Kendo will point a gun at the player, but realize the player is a human and instead locks the door of the gun shop to prevent anyone else from entering. However, the zombies will eventually find a way into the shop by smashing the glass. The player will have to leave the shop and proceed to room 1020, which is the back alley.
In this article, we will be running the original Resident Evil 2 and the open source version OpenBiohazard2. The open source version has partially implemented the game, which means some features such as zombies won’t show up. The open source version will render the areas for debugging and log the script statements in the output, which makes it much easier for us to understand how the game works internally.
The script viewer will also be used to understand the code. As mentioned in the script viewer article, in every room, the game will run the initial script “init.scd” when loading the room and run “main.scd” after the room is loaded. Only some part of “main.scd” will be run as part of initialization. The functions will be referred to by a numerical id, based on the order in which they appear in the file. “init.scd” only has one function “Function 0” and for this room, “main.scd” will have functions 0 to 34.
When the player interacts with a trigger area, some function in “main.scd” will be executed, which determines the game events. The trigger area will be referred to as an AOT. There are multiple types of AOT.
- AOT type 0 does nothing.
- AOT type 1 is for the area around the door that lets the player enter or exit.
- AOT type 2 is for the area around the items or static objects, e.g. ammo.
- AOT type 3 is unknown.
- AOT type 4 is for messages that show up when the player interacts with an object.
- AOT type 5 is for triggers. When a player steps on this area, a function in the main script will be executed.
Room initialization
Init script
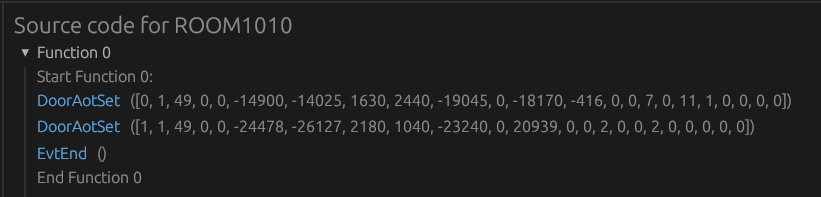
The initial script “init.scd” will run. AOT 0 and 1 will be initialized for the doors, one for the entrance and one for the exit respectively.
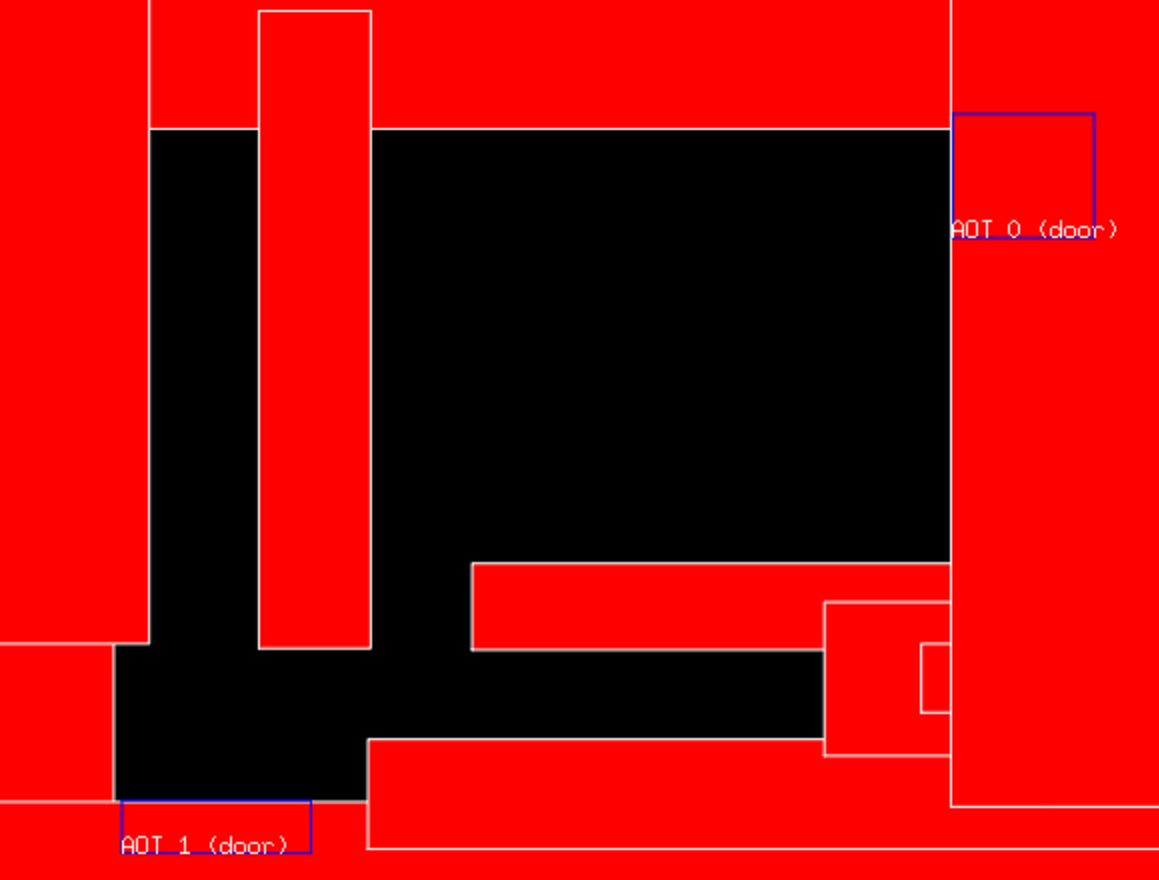
The red blocks are the collision entities, which would be used for the walls and counters. The dark blue area represents the door trigger. Leon will enter Kendo’s Gun Shop at AOT 0 on the top right and exit AOT 1 on the bottom left.
Main script
ScriptThread 0 will run starting function 0. Functions 2 and 4 are called indirectly using gosub().
The source code for function 0 and function 2:
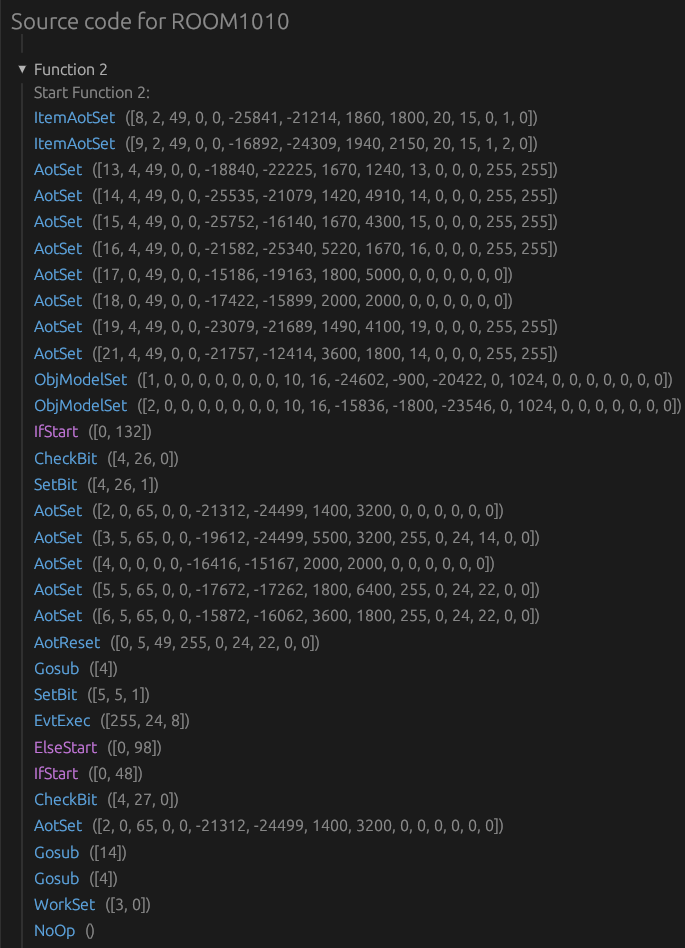
The rest of function 2 isn’t shown in the above image.
In the below images, we will examine the AOT objects initialized. The light blue rectangle represents the trigger area.
Type 2: Items
In function 2, AOT 8 and 9 will be initialized as items with type 2 using ItemAotSet(). Objects will be initialized with id 1 and 2 using ObjModelSet(), which places a 3D model in the scene that will be visible to the player. Objects 1 and 2 correspond to handgun ammo.
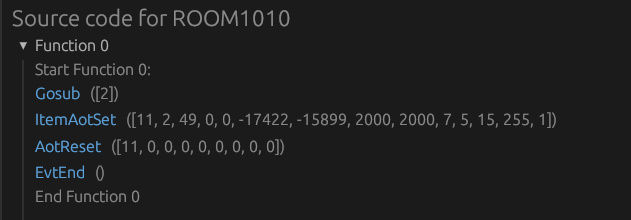
At the end of function 0, AOT 11 is initialized as an item with type 2, which is the shotgun. This item won’t be available for the player until after Kendo dies and drops the shotgun.
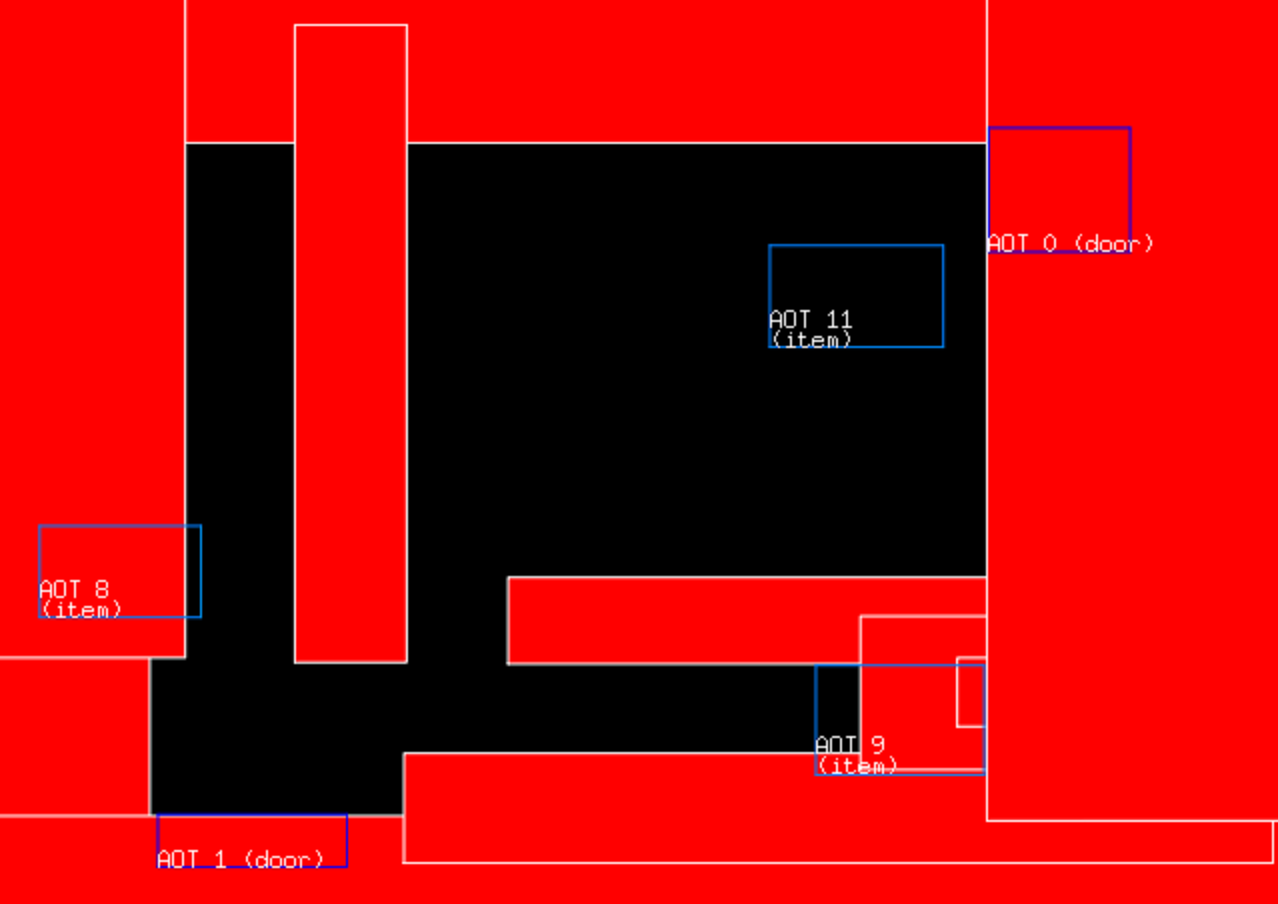
Items:
- AOT 8: Trigger for handgun ammo
- AOT 9: Trigger for handgun ammo
- AOT 11: Trigger for shotgun
Type 4: Display messages
AOT 13-19 and 21 will be initialized with type 4. The purpose is to display messages when the player uses the action button next to a location.
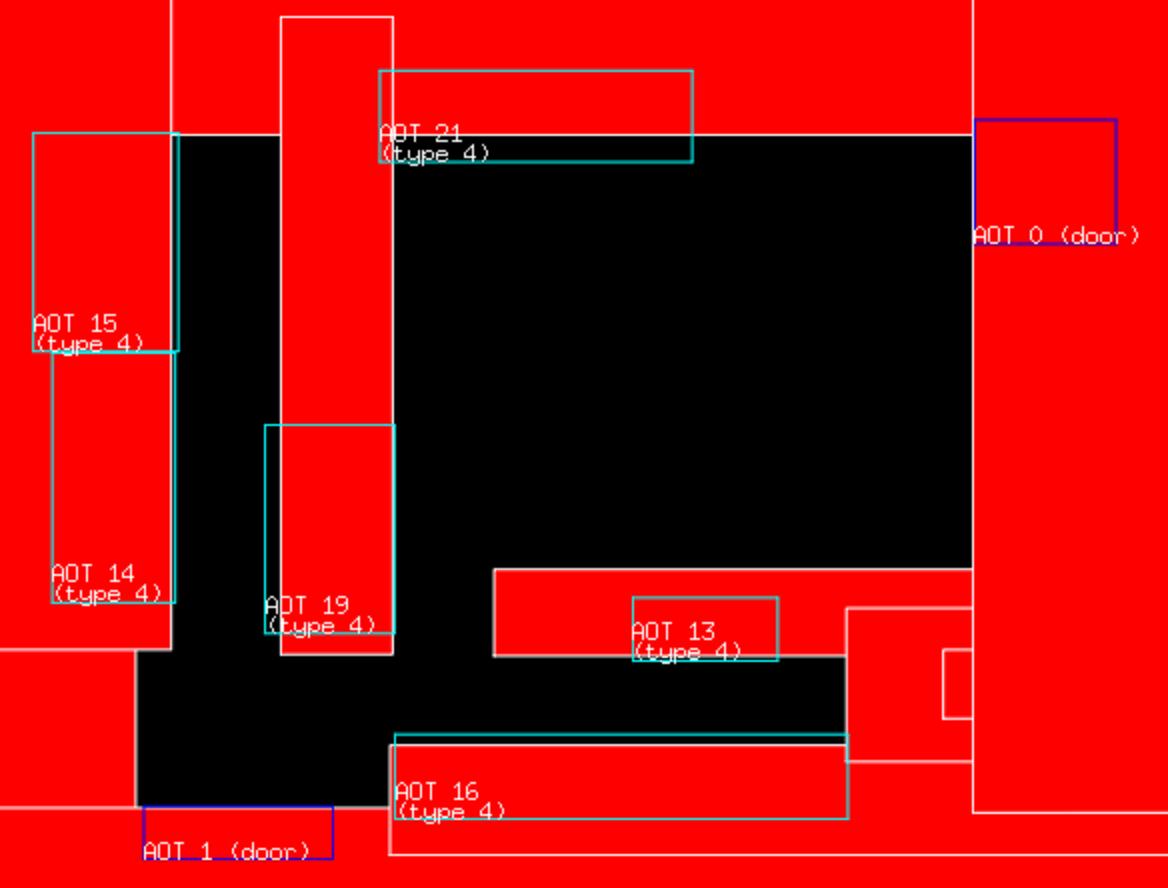
Display messages shown in the game:
- AOT 13: “Paper dated Sep. 18th. It looks irrelevant.”
- AOT 14: “The case is broken. There is nothing useful inside.”
- AOT 15: “There is nothing useful here.”
- AOT 16: “More useless trinklets.”
- AOT 19: “Gun cases and related paraphernalia.”
- AOT 21: “The case is broken. There is nothing useful inside.”
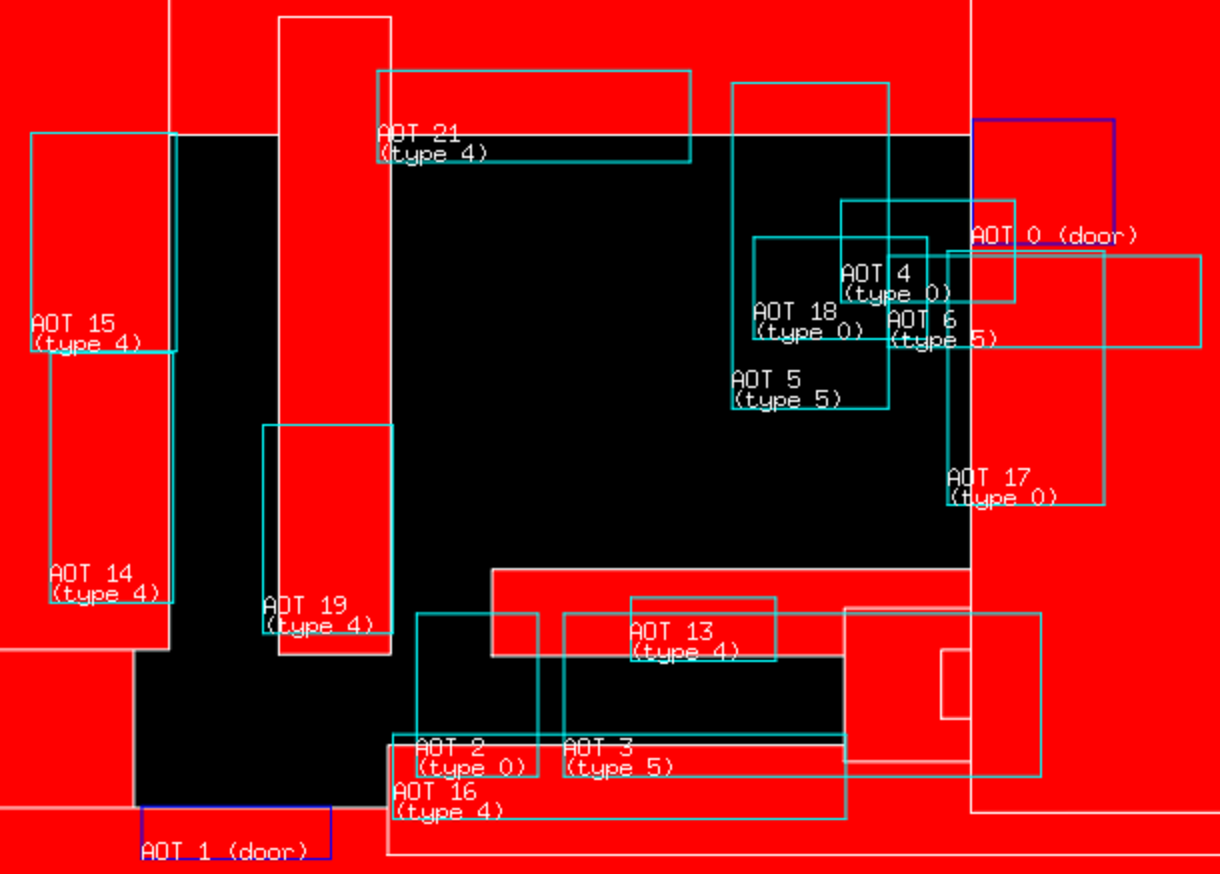
Type 0 and Type 5: Triggers
AOT 2 and 4 will be initialized with type 0. They won’t have any effect now, but will be activated later. AOT 3, 5, 6 will be initialized with type 5 as trigger areas. Stepping on these areas will execute script code.
AOT 0 was reset from a door AOT and assigned type 5. AOT 0 corresponds to the entrance area and leaving through the entrance will execute script code.

Triggers status:
- AOT 0: Door entrance that will trigger cutscene with Kendo.
- AOT 2: No effect. Trigger area in the back of the store.
- AOT 3: Trigger area in the back of the store.
- AOT 4: No effect. Trigger area near entrance.
- AOT 5: Trigger area near entrace that will trigger cutscene with Kendo.
- AOT 6: Trigger area near entrace that will trigger cutscene with Kendo.
AOT 1 isn’t mentioned because AOT 1 is for the exit door and it’s not modified in the script.
Entities
Dynamic entity 0 initialized using SceEmSet() with id 72 (Kendo). Dynamic entities 1, 2, 3, 4 initialized using SceEmSet() with id 31 (zombies)
Summary
At end of running ScriptThread 0, we have initialized the following:
- AOT initialized (AOT 0-6, 8, 9, 11, 13-19, 21)
- Static objects 1, 2, which correspond to ammo
- Dynamic entities 0-4. Entity 0 corresponds to Kendo and entities 1-4 correspond to zombies.
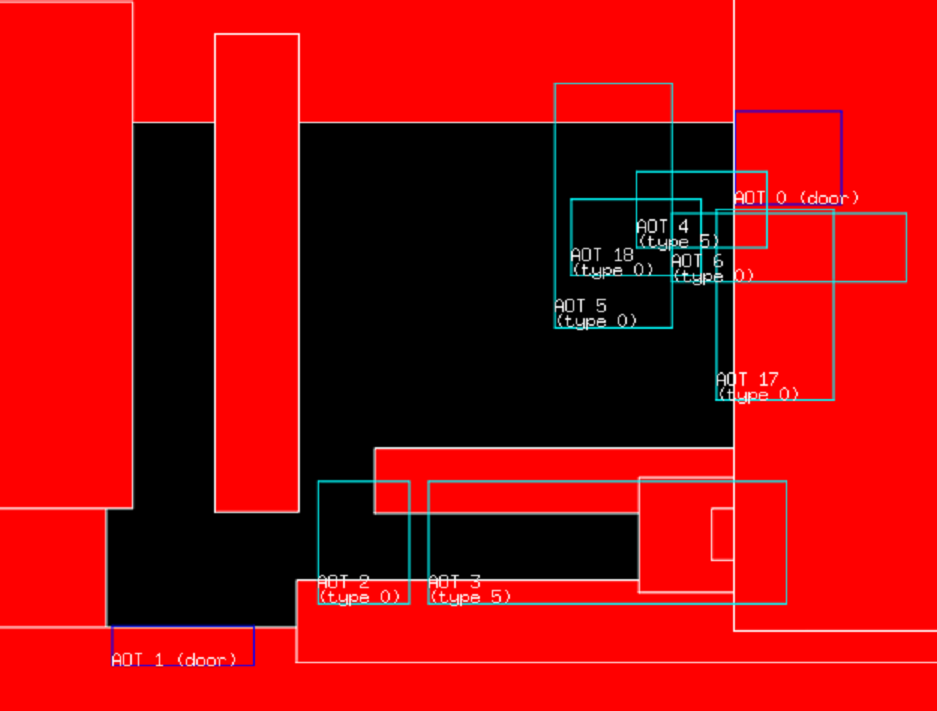
The image below shows what is initialized. Items were excluded from the image because the text overlapped with the other boxes:
In this article, we will mostly focus on AOT 0-6, which are used to trigger the cutscenes. The remaining script threads will set some variables.
- ScriptThread 1 runs starting function 1 and calls function 3 to set bit array values. The purpose is unknown.
- ScriptThread 2 runs starting function 5 and calls function 6 four times to run MemberSet() for zombies. The purpose is unknown.
- ScriptThread 3 runs starting function 8. The camera view is changed to camera 5 and initializes the player’s position.
No more script threads will run until the player steps into a trigger zone, which will trigger the cutscene with Kendo.
Cutscene with Kendo
In Resident Evil 2, the game uses prerendered backgrounds and each room will have multiple cameras. Based on the zone the player is in, the game will determine which camera and prerendered background to show.
During the cutscene, the camera and prerendered background will automatically be changed to show different views of a scene. There are sleep calls to control the timing of each camera view and how long to wait. At the end of the cutscene, the camera will focus back on the player to know when they can regain control of their character.
To understand the position of the cameras, the image below shows the cameras used in the cutscene. Only cameras 0, 5, 10, 11 are shown for clarity, but the room has other cameras which aren’t part of the cutscene.
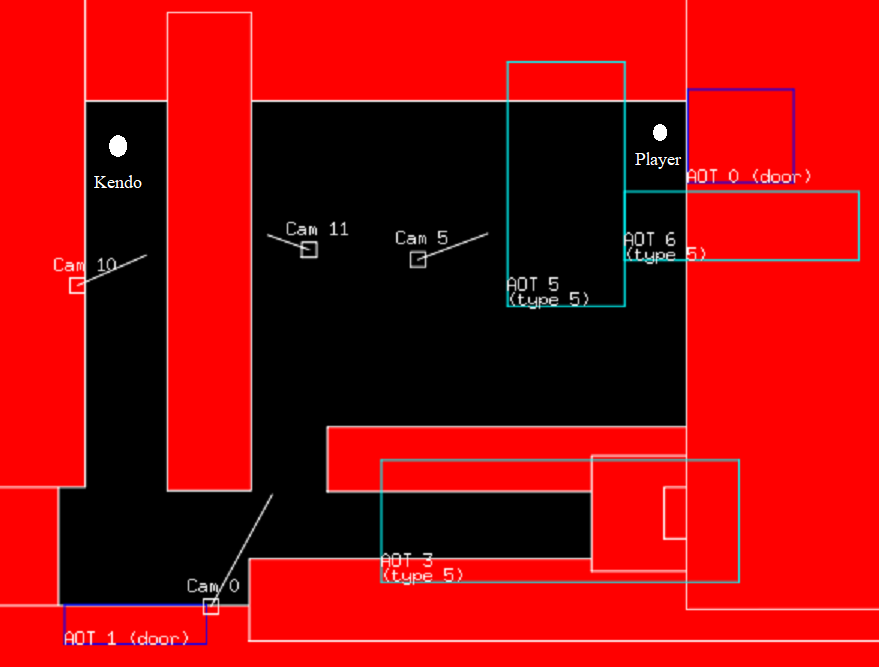
The cutscene will trigger when you try to leave the store through the entrance (AOT 0) or when you try to move inside the store and step on a trigger area (AOT 5 or AOT 6). No matter which trigger area you step on, the script will call EvtExec(), which will start a new script thread and execute any code that was defined for that function. When the camera is changed, the script calls CutChg() to change the view.
When the cutscene is triggered, the script runs function 22 in “main.scd” using EvtExec().
- AOT 0, 5, 6 get reset to type 0. These areas previously were used to trigger the cutscene, but setting these areas to type 0 ensures the cutscene is only triggered once.
- Camera view changed to camera 10. The camera zooms out from player and shows both Leon and Kendo.
- Camera view changed to camera 11. The focus is on Kendo, who raises his shotgun.
- Camera view changed to camera 5. The focus is on the player.
- Camera view changed to camera 10. The camera zooms out and shows both player and Kendo.
- Camera view changed to camera 11. The focus is on Kendo, who lowers his shotgun.
- EvtExec() called for functions 23, 25, 27 to control player and Kendo animations.
- Camera view changed to camera 5. The focus is on the player. Kendo walks over next to the player. Kendo locks the door and talks to the player.
- EvtExec() called for functions 26, 24, 9 to control player and Kendo animations.
- Camera changed to camera 0. It is zoomed out and different from the previous views. Player regains control of the character and can now move.
- AOT 0 and 4 are reset. They are assigned to type 5 and will trigger function 28. This area seems to trigger when the player tries to leave through the entrance and Kendo will tell the player to stay inside.
In the image below, you can see the result of the changes:
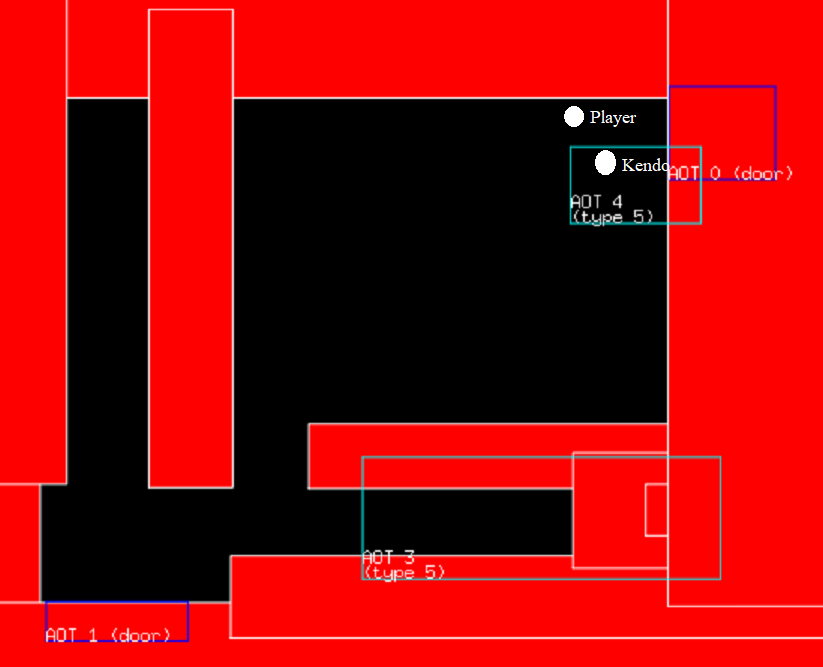
Status of the trigger areas after cutscene with Kendo:
- AOT 0: No effect. Entrance door is locked.
- AOT 1: Exit door which the player can leave through.
- AOT 2: No effect. Trigger area in the back of the store.
- AOT 3: Trigger area in the back of the store.
- AOT 4: Trigger area near the entrance where Kendo is standing. If the player talks to Kendo, Kendo will tell the player it’s safer to stay inside.
- AOT 5: No effect. Previously used to trigger cutscene.
- AOT 6: No effect. Previously used to trigger cutscene.
When we compare OpenBiohazard2 to the original, we can see the timing mostly matches, except for the last camera view where Kendo locks the door.
OpenBiohazard2
Original Resident Evil 2
The zombies break the glass
When the player moves to the back of the store to pick up ammo, they will step on AOT 3, which will call function 14, but won’t trigger an immediate reaction. Function 14 will set AOT 2 to be type 5.

When the player tries to leave the store or move closer to Kendo, the player will step on AOT 2 and trigger the cutscene where the zombies break the glass.
The script will run function 10 in “main.scd”, which triggers the cutscene:
- AOT 2 and 4 will be reset to type 0.
- The position of 4 zombies is initialized. These are the zombies that will break the glass and attack Kendo.
- EvtExec() will be called for functions 13 and 30.
- In function 13, there are a large number of SceEsprOn() calls that will generate sprite animations, which seems to correspond to the glass shattering.
- In function 30, Kendo is fighting the zombies. In function 30, there is a EvtExec() call to function 31. In function 31, there are more sprite calls and a EvtExec() call to function 32. This part seems to correspond with the zombies attacking Kendo.
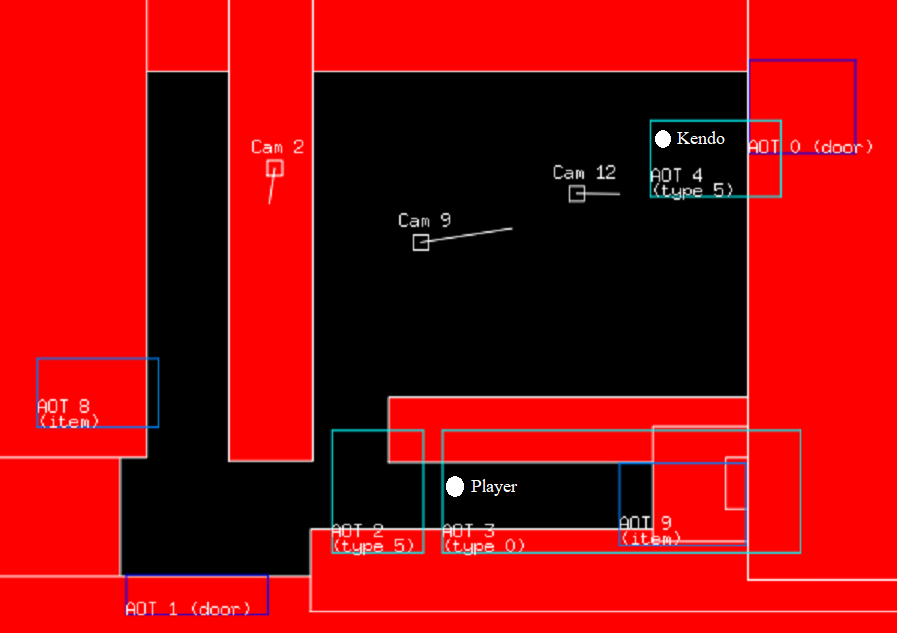
- Camera view changed to camera 12. The camera is zoomed in on zombies who break the glass and begin to attack Kendo.
- Camera view changed to camera 9. The camera is zoomed out to show zombies and Kendo.
- Camera view changed to camera 2. The camera shows the back of the store, where the player is located. The player regains control.
- AOT 0 and 17 will be reset to type 4 to show display messages.
- AOT 18 will be reset to type 5 and trigger function 29. The purpose of this function is unknown.
When we compare OpenBiohazard2 to the original, we can see the timing matches. The cutscene takes around 10 seconds, but the background music in the original game adds the horror effect and makes the scene much more scary.
OpenBiohazard2
Original Resident Evil 2
Further Improvements
OpenBiohazard2 has implemented the cutscenes and triggers correctly, but there are still parts of the game that haven’t been implemented.
Tasks needed to match the original game:
- Show the models and animations for Kendo and the zombies
- Allow the user to pick up ammo and add to the inventory.
- Show the shotgun that Kendo drops after getting attacked by zombies
- Play the background music for this room